


Hey guys! I hope you've had a wonderful spring week in your neck of the woods.
I do like to "keep it real" around here, but
posting blog photos with dishes in the sink? Yes, well...it's been a busy (but fun!) week around here. I was anxious to show you my 'finally finished' junk style shades for our kitchen pendant lights, so I hope you'll forgive my less-than-tidy sink today.

About a month ago I shared my Farmhouse Style Kitchen Update. We actually live in a fairly new, more contemporary style home, so "farmhouse" is really more of a dream than a reality.
But I've tried to bring in some of the vintage farmhouse feel that I love without looking crazy with the style of the house. One of the biggest challenges in this space has been the very contemporary light fixtures.

We are renting our home, and although I do own a couple of really cool vintage chandeliers, I haven't wanted to invest the effort into actually taking down the existing fixtures, installing the vintage fixtures and then having to undo all of that when and if we move.
A temporary fix I created in the dining area is this shade I built out of vintage garden fencing (and a hula hoop!) to simply camouflage the fixture I didn't like. I've updated the fabric since I first hung it, but you can find the original tutorial here.

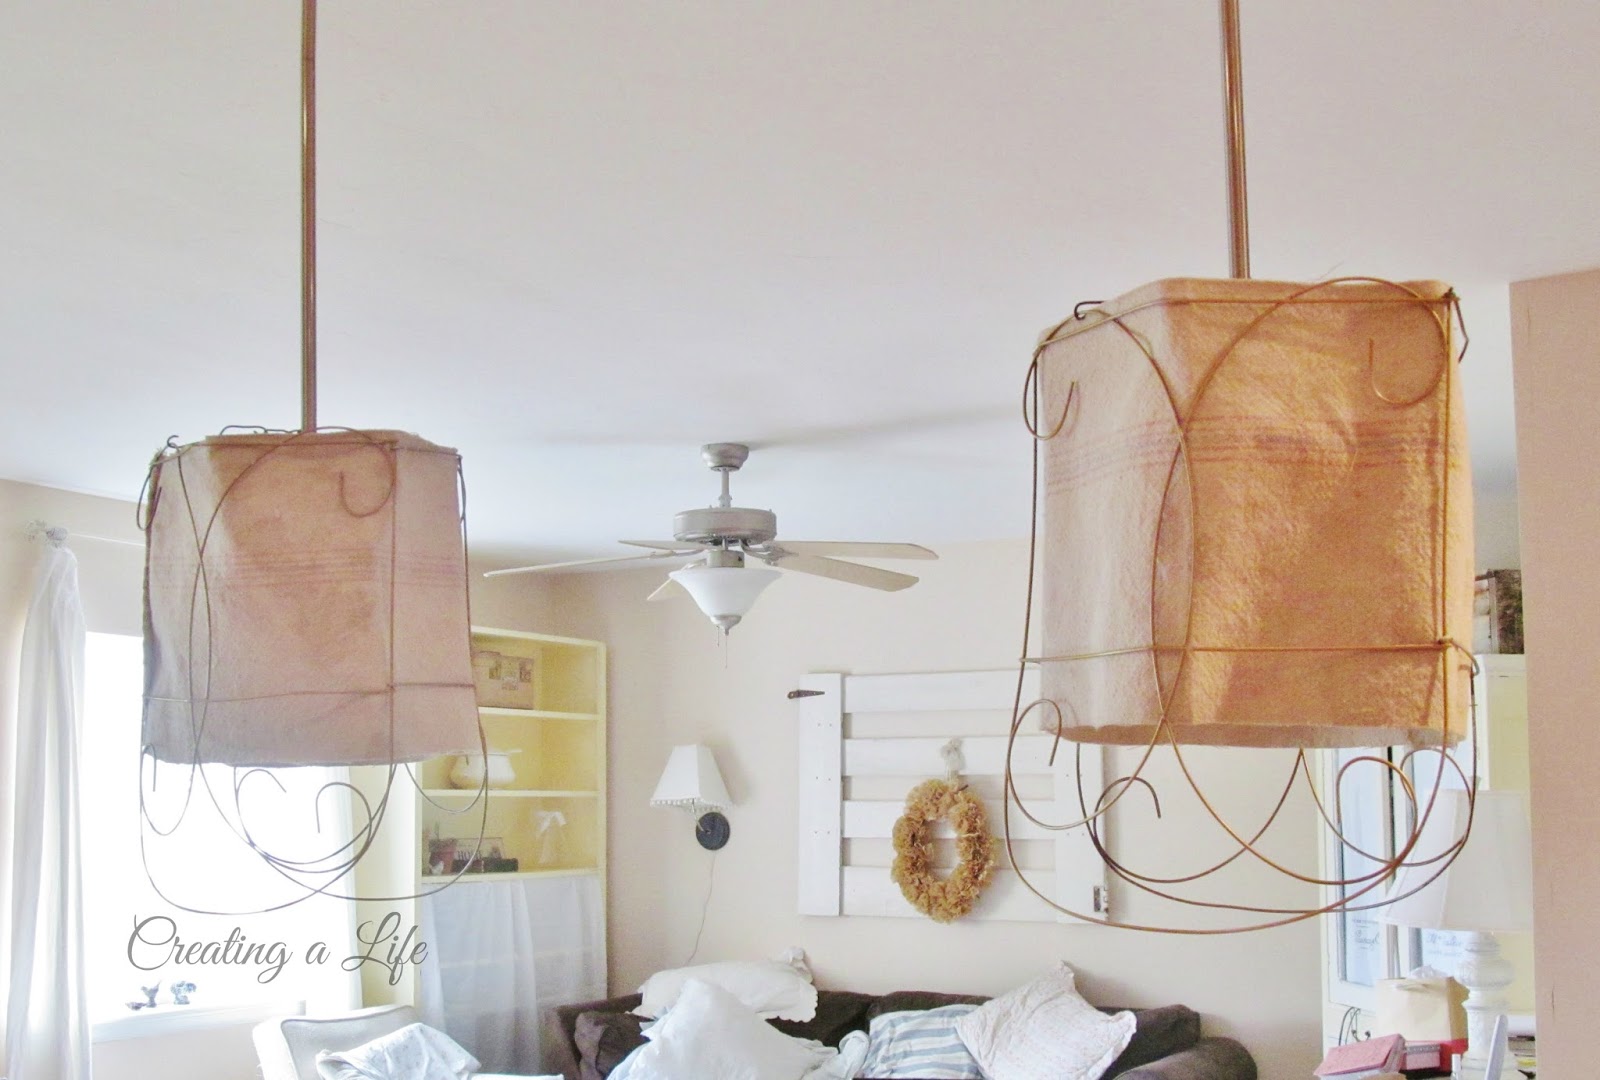
In the kitchen I've also been wanting to find a way to create something that ties in with the dining room shade, that would hide the two contemporary glass fixtures over the island.

I decided I'd just try to make some smaller versions of the large shade. Here's how I did it:

Last year I picked up quite a bit of this old wire garden edging for free during a nearby city's annual spring clean-up.
For these smaller shades I took two-section pieces and basically folded it in half, and used needle nose pliers to attach them together. Then I simply started shaping the "frame" by gently bending the pieces into the shape I wanted (bottom right photo).
I forgot to photo the fabric part, but I cut some scraps of vintage feed sack to the height I needed to cover the glass shade. I just added spots of hot glue on the inside of the shade to hold the fabric in place. It is very much NOT perfect. The fabric is really old and frayed and has spots that are there to stay, but it's just the look I was going for!


Terrible photo, but as you can see, I found some old rusty wire in my 'stuff' and formed it into a loop around the top of the fixture. It needs to be small enough to stay firmly in place by resting on top of the existing light.

Oh, I almost forgot to tell you- I had originally planned to use the long straight pieces of the fencing that would go into the ground, to bend into the top supports. But when I tried to bend them the way I wanted, they snapped right off. So, on to plan "B"....
I cut two more pieces of wire for each shade, and I think the photo speaks for itself. This is very primitive, I know. Let's not forget the Creating a Life m.o.- I always try to come up with a way to make what I want using stuff I already have, and I don't want to spend any money! Besides, these lights are high enough that you can't see this part.

.jpg)
I'm happy with the way they blend with the dining room shade.

Now, what can I do about that ceiling fan........ : )

Cute, rustic, one-of-a-kind and FREE- yay! Haha
Thanks so much for coming by to see what I've been working on, friends. Have a wonderful mid-May week!
Jeanette
Joining these great parties this week-
Share Your Creativity at It's Overflowing
Fabulously Creative Friday at Jennifer Rizzo
Fridays Unfolded at Nancherrow
Treasure Hunt Thursday at From My Front Porch to Yours
Share Your Cup Thursday at Have a Daily Cup of Mrs.Olson
Wow Us Wednesdays at Savvy Southern Style
What's It Wednesday at Ivy and Elephants
Knick of Time Tuesday
Nifty Thrifty Tuesday at Coastal Charm Knick of Time Tuesday
The Scoop at Worthing Court
Tweak It Tuesday at Cozy Little House
Metamorphosis Monday at Between Naps on the Porch
Inspire Me Tuesday at A Stroll Thru Life
Sundays at Home at Thoughts From Alice
Party Junk at Funky Junk Interiors
Junkin' Joe at The Cottage Market
Home Sweet Home at The Charm of Home
Feathered Nest Friday at French Country Cottage
I love this Jeanette!!!
ReplyDeletesuch an innovative idea! I also think it goes so well with your kitchen.
Have a great weekend
Kate xoxo
I love the first one you did and these two now are great too. This is so creative and awesome and free it does not get any better than that. They look marvelous! Have a great week end.
ReplyDeleteKris
Pinned. What a great idea. They suit your kitchen.
ReplyDeleteJoy
Perfect, those are to stinkin cute. You do great things with your rental.
ReplyDeleteI feel the same with our house... So I could not wait to read your DIY... I love it, it`s so simple and beautiful. I definitely going to do one (or two)... Have a nice weekend. Thank you, Alexandra
ReplyDeleteYour pendant lights turned out great! Very creative idea!
ReplyDeleteMary Alice
I LOVE them...perfect in your kitchen!!
ReplyDeleteI loved the original light re-do. Now you're inspiring me to make some much needed changes in my home! Thank you for the inspiration :-)
ReplyDeleteThis comment has been removed by the author.
ReplyDeleteClever! On an unrelated note...I love your "1.2.3" kitchen stools! Stopped by via Knick Of Time Linky Party.
ReplyDeleteBeautiful!
ReplyDeleteIngenious, Jeanette! What a super idea. Pinning this. :)
ReplyDeleteWhat a great way to disguise the ugly builder's grade fixtures! Brilliant really! I too live in a newer home but am a lover of the farmhouse style and try to incorporate that into my home and blend the looks! I really love this! Pinning :)
ReplyDeleteJeannette, this is something I would do, and something close to what I have done on a lampshade :)
ReplyDeleteNow as for changing out your chandeliers in place of the rental homes should not stop you, I've done just that taking down the existing ones for mine. I put their lighting in a large Rubbermaid tub and out in the corner of the garage. It is really easy to change out and you will be shocked when you do it saying why did I not do this when I first moved in?
In fact on one home I rented right after I sold my home I went as far as changing out all the outside exterior fixtures as well, but the outside ones I left when I moved into my investment home. I bought those galvanized metal farmhouse lanterns for the outside at lowes a $60.00 investment due to some discoloration to one that they felt was wrong yet I saw as being so right all three of them was a deal enough for me to change out the old for a better inviting look across the face.
So try one, turn off the switch and open the cap and untwist the wires and copy the same methode for the old chandelier get help holding up the weight of your lights, if my daughter and I can so it so can you!!
You will love living with the outcome, unless your only planning to be in your rental a few months, but months seem to turn into years, like it has for many of us.
Your new wire fencing looks great!!
See you soon
Xx
Dore
Can you email me with your address?
DH4designs@aol.com
Hi Dore,
DeleteSo odd, may of my comments didn't come to my email this time, so maybe you'll come back over here to see this.
Yes, I would very much be in favor of changing out the fixtures in a place I was certain I'd be staying for awhile! I haven't spoken of it much, but we did get word that our home may be going on the market soon, so we will be looking for a new place. Trying not to stress until we know for sure. God is in control. When I get to a place where I can put up my beloved chandelier, you can talk me through it, okay? :)
Hope you're enjoying your weekend!
Jeanette, I love them! I remember how you made the first one and thought it was genius! I have double pennants like that over my island. Would love to do something like that. I have a roll of garden edging I got at a yard sale years ago. I think it's green, but maybe I could spray it. Thanks for the inspiration! Pinning.
ReplyDeletehugs,
Jann
Great idea. I love old garden fencing! I've seen it used in lots of ways in decor. Your fixtures are lovely!
ReplyDeleteI found you via Facebook! (Duncan Farmstead) Lovely blog. I think I'll follow--and pin, too!
ReplyDeleteBlessings!
Brilliant! I love them, Jeanette!
ReplyDeleteWhat a brilliant solution! I love how you upcycled that fencing into something totally different. Just pinned! Would love for you to share at Fridays Unfolded this week!
ReplyDeleteAlison
Nancherrow
Rustic Farmhouse Style Pendant Light Shades. Hey guys! I hope you've had a wonderful spring week in your neck of the woods. I do like to ... rusticlampshades.blogspot.com
ReplyDeleteThose DIY shades for your kitchen pendants look fabulous. I've tried shaping thick wires into something elegant as that and it was hard, so kudos to you for managing just that! Hahaha! Anyway, I also think your choice for the cloth is perfect in its beautiful imperfections. Thank you so much for sharing that DIY feat, as well as those pictures. I hope you and your family are in the best of health this autumn.
ReplyDeleteEleanor Roy @ Douthit Electrical
Thanks for your information, it was really very helpfull..
ReplyDeletePendant Lights
it was a wonderful chance to visit this kind of site and I am happy to know. thank you so much for giving us a chance to have this opportunity..
ReplyDeleteHome Inspection El Paso