Related Posts Plugin for WordPress, Blogger...
Showing posts with label chalkboards. Show all posts

Monday, February 24, 2014

DIY Hutch in the Entryway


Welcome to a new February week, friends!

Recently, I had the honor of being featured in Artful Blogging Magazine. One of the "perks" of that experience was receiving a gift card for Stampington & Company's  online store, The Shoppe at Somerset


If you haven't visited Stampington's website or shop, you will simply be amazed at all of the creative resources they offer. This is not a "sponsored" post, I've really just been a fan of their magazines and website for years! 


So, this week I thought it would be fun to show you a little DIY hutch I made to replace the dresser that's been in the foyer. The dresser has been moved back to the living room {post on that soon} and I decided this would be a good spot to display some of the new things I chose from The Shoppe at Somerset, and start adding a hint of spring to our home. 

For a girl like me who is always on a very tight budget, I'm all about 'shopping' my own house and re-inventing pieces for a new purpose and a fresh look. To be able to have some actual new (!) decor items to play with is such a treat for me! 


Here are the pieces I pulled together to create the hutch that will showcase some of my new pieces alongside some of my timeworn favorites. 


If ever there was a workhorse piece of furniture in my home, this little table is it! 

About 7 or 8 years ago, I was driving home and spotted this table curbside next to the 'leftover' pile from a yard sale. 

Reflecting back now, there may have been voices coming from my family in the van yelling things like, "Nooooo, Mom!" and "Don't do it!!" and "It's reaaaally ugly!!". 


Maybe

My memory isn't always the best.

Anyway, needless to say, I stopped. The woman who had been hosting the sale came to her front door and said, "Please take it!". 

Alrighty, then!

I stuffed it in the van, ignoring the protests and eye rolling,  and I've never regretted it! 

This sturdy little table has been an end table, a sofa table, a nightstand, a desk, a kitchen island and last Valentine's Day, it even served as our Valentine Love Note Station.

Okay, enough gushing about my little table....

The next piece in the equation is a cute little white bookshelf that I actually paid for at a yard sale many years ago : ) All of five dollars, I think. 


(Sorry, terrible photo)
I removed the wood pieces that the legs are attached to so it could sit on top of the little wood table. 


If the bookshelf never goes back to being a free standing piece again, I will definitely use these for another project. I already have a few ideas brewing...


The last piece I used to create the 'bones' of the hutch is a vintage cabinet door that I also picked up curbside last spring. 


It fits perfectly across the bottom leg braces of the table, creating a generously sized shelf. 
Now, I'm guessing a lot of you would probably paint this table. I have thought about it, but I just like the warmer wood tone and the aged look of it in combination with my other painted pieces. 


It's all ready to add some fun things! 


On the top of the hutch, a little chalkboard I created from an old kitchen cabinet door with my thrift store "N" in front, a vintage scoop and white iron bird. 


My new french farmhouse caddy from The Shoppe at Somerset! It actually has four sections inside and I'm already thinking of all the different ways I'll be able to use it. Fun!


In my last post {over here} I showed you a gorgeous bucket of flowers from my friend. Sadly, this Baby's Breath and greenery are all that's left of it this week. I need another bucket of flowers! 


My old tin pitcher, iron bird, fern print and weathered black frame have been around here a long time. 


On this shelf, a couple of new, and just new to me, items. The composition book and metal library drawer are from Stampington and the old wood finials I picked up at a thrift store this week for about a dollar. 


I know this library drawer is going to be used in many different ways for a long time to come. So many possibilities! 


I haven't had an actual garden for over 3 years, and I couldn't find any of my old tools. I just tucked in this vintage metal scoop because I like the way the aged metal looks with the other items. 


This sweet little bird has been in my collection for quite a few years.


I bought this rustic looking wooden box at a thrift store last year. I don't think it's really as old as it looks, but I thought it had some charm to it. I attached an old wooden knob to it to make it look more like an old drawer. 

If I'm smart, I'll toss my keys in there when I come in the door so I'm not always looking for them!


On the bottom, I started with this wire basket. It was (you guessed it) another curbside freebie last spring.
I can't wait to see what I find at this year's community "Spring Clean-Up"! 


In the basket I placed some old field guides, a vintage black scrapbook cover with a green chalkboard attached to it, another cabinet door chalkboard and the galvanized flower bucket from my friend. 

No, the tulips aren't real. Let's just pretend, okay? ; )


I put my blue kitchen stool next to the hutch for a little spring color.


At one time this iron bird trellis was in my flower garden (at my previous home). I think the white plastic light switch really enhances the rustic look of this piece, don't you? {smile}

I wonder if I'll ever have a garden spot again...


 Looking down to the foyer from the upstairs hallway. 


Here's what this area looked like when I shared it with you this past Fall. {you can see that post here}


 And today with my practically free DIY hutch. 


While I don't "love" not having much money to spend, I do love being able to pull together something new from items I already have. That's part of what Creating a Life means! 

What are you working on this week? I'd love to hear about what's changing at your place!

Blessings-

     Jeanette


Join me this week over at
The Scoop Mega Spring Party at StoneGable
What's it Wednesday at Ivy and Elephants
Party Junk at Funky Junk Interiors
Home Sweet Home at The Charm of Home
Feathered Nest Friday at French Country Cottage
Be Inspired at Common Ground
Thrifty Life Thursday at Revisionary Life
Treasure Hunt Thursday at From My Front Porch to Yours
Under $100 Party at Beyond the Picket Fence
Wow Us Wednesdays at Savvy Southern Style
Inspire Me Tuesday at A Stroll Thru Life
Tweak It Tuesday at Cozy Little House
Metamorphosis Monday at Between Naps on the Porch

The Scoop at The Everyday Home
Nifty Thrifty Tuesday at Coastal Charm


Sunday, July 7, 2013

Chalkboard Style Tags


I hope everyone has recovered from their July 4th festivities! 

For the second year in a row, our town could not do their fireworks show on the 4th because we are under a fire ban. Boo! Things are extremely dry around here, making for super high fire danger. At least the weather was lovely, and we had a good time spending the whole afternoon/evening with friends at a "Freedom Festival" that has been our tradition for over 10 years! 
I don't know about you, but I'm ready to start a new July week!


I have a fun little project to share today. A friend gave me an unopened package of these heavy cardboard coasters and I decided to create some fun chalkboard style tags with them.


They are a little over 4" across, and I liked the idea of an over-sized, writable tag that could also be strung together to create a banner for many occasions.


I punched a hole in each cardboard circle. This was a little difficult with my little hand punch, so I switched to a heavier punch and that made a big difference. I painted both sides with ordinary black acrylic craft paint.


 Did you know you can use ordinary black paint to create a chalkboard surface for many craft projects? I've done this on lots of small chalkboard projects, and it works great! Of course it's not a washable surface like "real" chalkboard paint, but it's fine for an application like this one.

I "seasoned" each circle by rubbing the side of a piece of chalk over each side and erasing with an ordinary felt chalkboard eraser. This gave a soft, almost zinc looking, appearance to each tag. 
I added a strip of heavy canvas scrap to each one. 


I used some letter stencils to test out how the chalk writing would look on the surface. 


I also tried some number stencils with chalk. Pretty cute, huh?
 

I really like this look!


The chalk erases easily from the surface making these ideal to re-use for many different occasions!

I have two sets of 10 listed over at The Penny and the Pearl today.

I'll be back soon to share some other projects I'm working on. Have a wonderful Monday, friends!

Jeanette


Come join the fun with me over at:

Inspiration Monday at twelveOeight 
Metamorphosis Monday at Between Naps on the Porch
Creative Bloggers Party at Homemaker on a Dime  
Nifty Thrifty Tuesday at Coastal Charm 
Make it Pretty Monday at The Dedicated House 
The Scoop
Tweak It Tuesday at Cozy Little House 
Wow Us Wednesdays at Savvy Southern Style
Inspire Me Tuesday at A Stroll Thru Life 
Share Your Cup Thursday at Have a Daily Cup of Mrs. Olson 
Tutorials Tips and Tidbits at StoneGable 
Transformation Thursday at The Shabby Creek Cottage
Fabulously Creative Friday at Jennifer Rizzo  


Thursday, June 27, 2013

Summer Living Room

I think I'm well behind everyone else in sharing their Summer mantel and general Summer decor.  That's ok, I'm pretty sure I'll be behind everyone else when Fall rolls around too! : )


The other day I showed you the vintage trunk coffee table  I finally finished. As much as I love this piece, I will be selling it. But I'm going to enjoy it in my living room for a few days more.  

I promised to show you around some of the other Summer details in this space, so be prepared for lots of photos. Grab some coffee or iced tea and let's have a little visit in the living room today!


The piano is actually between the living room and eating area. I don't think I've shown the piano since  Christmas time!
It was overflowing with winter goodies back then, but in the Summer months I like to keep the decor to a minimum here.


 I try to keep the colors pale and light and decorate with our nature finds and some pretty glass.

My vintage window is just propped in front of the mirror with a botanical print tucked behind, and a chunky white candle in an old pickle jar in front. You'll be shocked to know I already moved the other candle :)


Ticking stripes (even brown) always seem summery to me.


Vintage sheet music wreath still holding together after all these months!


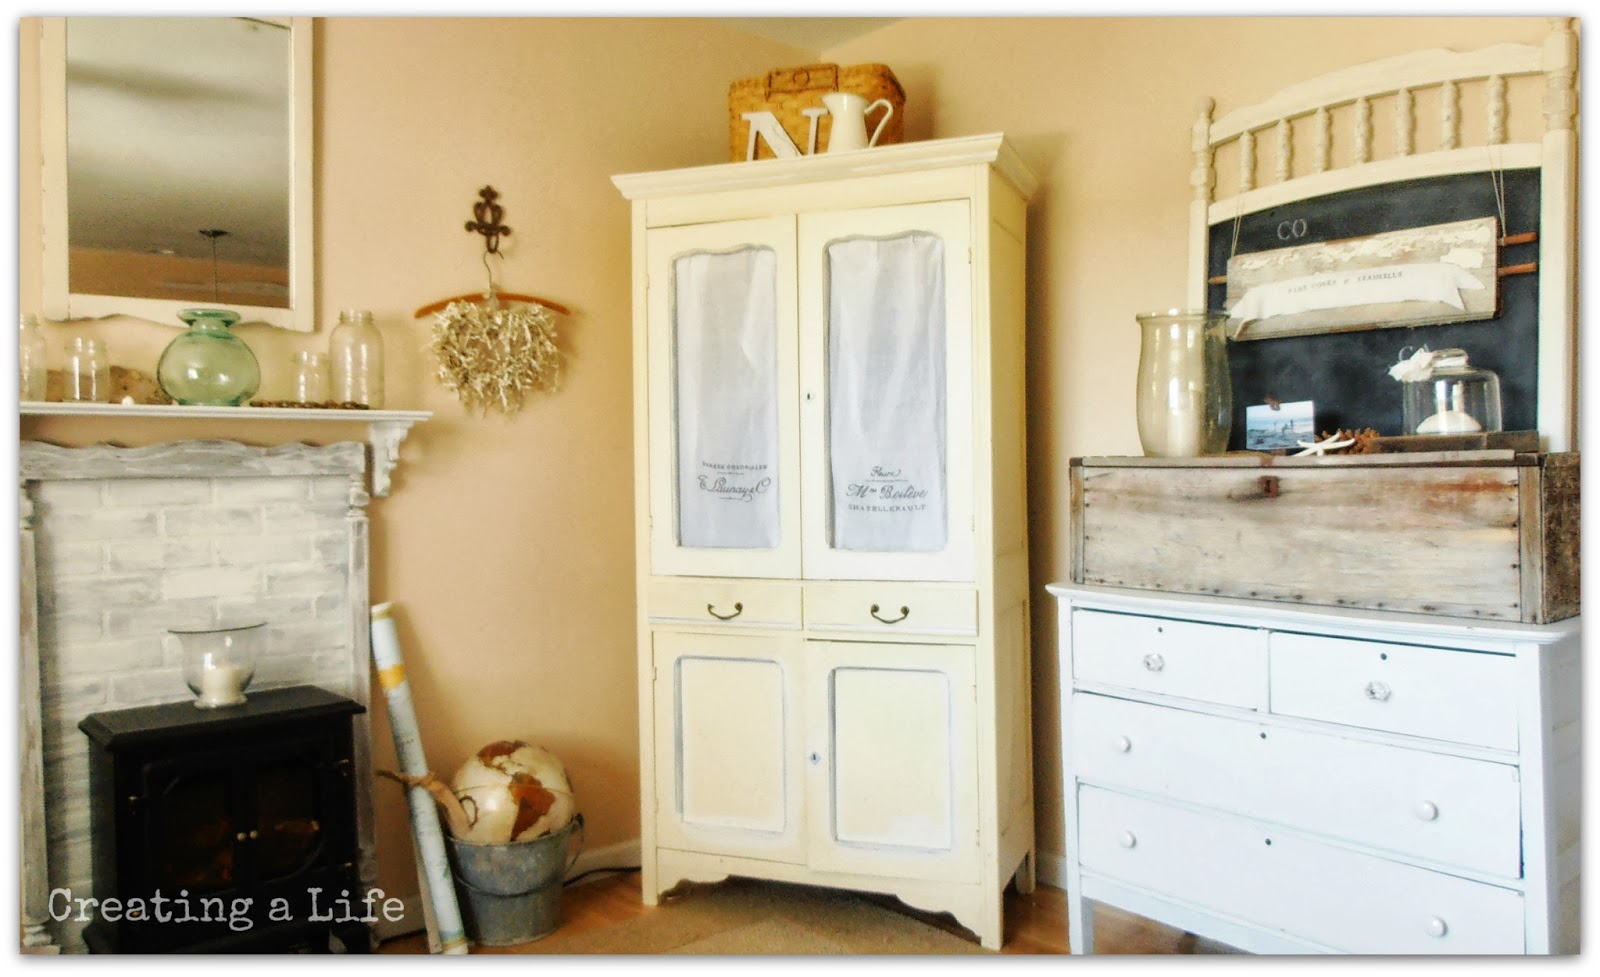
Over on the faux mantel I turned over a heavy aqua glass vase, and thought it hinted at the look of those gorgeous glass fishing floats I've seen all over online. Use your imagination ; )

Driftwood, a bird's egg shell and a rusted piece of boat chain all gathered on a recent trip to our local lake, and an abandoned wasps nest from our own back yard make for my idea of perfect Summer decorating elements. 


This wall map and globe are well used during our school year, but for now they can just look cute tied up with burlap and sitting in a vintage galvanized bucket! 


Back in April I won my first ever giveaway, and showed you the pretty linens I was able to choose from the Frugal Ain't Cheap Etsy shop. Daniela makes the prettiest kitchen towels, and I ended up using the two larger ones as curtains in our t.v. cabinet in the living room!


I mentioned before how badly this cabinet needs to be repainted, but I'm holding out for some nice paint that's on my wish list.


Directly across from the sofa is a little white dresser (currently holding games and art supplies) with a vintage tool box on top. There are certain "junk" pieces that I never get tired of finding new places for, and this tool box is one of them. I bought this for just a few dollars at a farm sale many years ago. It's been used in three homes, indoors and out, and I still love it!


Here it is on my front porch two homes (about 10 years) ago. It's much more sun faded and weathered these days. 


I've been in Colorado for about 19 years and LOVE our lakes, rivers and of course, pine cones!
But I was born and raised in southern California and summertime always has me longing for the ocean. I'm really hoping we can get there some how this summer! I decided I'd put together a little vignette in honor of my love of Summer in my current home state and all the beautiful beach memories I have from my California home.


 Don't you just love the term "rustic"? It has served me so well when I make something, stand back to take a look and think, "Oh crud, that's a total mess!" "Look how charming and RUSTIC" -haha.
I decided to make a quick little stamped banner on a worn canvas scrap. It came out pretty crooked (rustic), but I like it.

"Pine Cones & Seashells" represent a tiny bit of what I love about Summer in my two states. I attached it to a piece of an antique door and hung it in front of my crib panel chalkboard. 


 A favorite photo of my kids on a very special California beach trip is clipped to the rusted latch that fell off the tool box, and sits next to a Colorado pine cone that my daughter gave me.


I'm so glad you stopped by to visit me in my Summer living room space! I wish you a beautiful Summer weekend, my friends.

Blessings-

Jeanette 

Come party with me over at...